Home > Oceania > Australia > Related Images
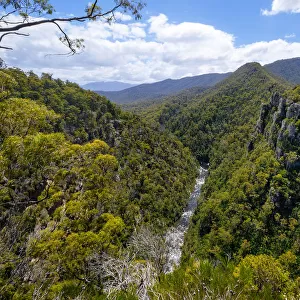
Launceston: The First Basin and Alexandra Bridge, Cataract Gorge (b / w photo)
")
![]()
Wall Art and Photo Gifts from Fine Art Finder
Launceston: The First Basin and Alexandra Bridge, Cataract Gorge (b / w photo)
6012272 Launceston: The First Basin and Alexandra Bridge, Cataract Gorge (b/w photo) by Spurling, Stephen (1847-1924); Private Collection; (add.info.: The First Basin and Alexandra Bridge, Cataract Gorge. Illustration for Picturesque Launceston and Surrounding Tourist Resorts, photographed bys Spurling (Spurling, c 1915).); © Look and Learn
Media ID 25161966
© Look and Learn / Bridgeman Images
Launceston Tasmania Tourist Alexandra Bridge Cataract Gorge
FEATURES IN THESE COLLECTIONS
> Fine Art Finder
> Artists
> Stephen Spurling
> Oceania
> Australia
> Related Images
EDITORS COMMENTS
This print titled "Launceston: The First Basin and Alexandra Bridge, Cataract Gorge" takes us on a journey through time to the early 20th century. Captured by Stephen Spurling, an acclaimed photographer from Tasmania, this image showcases the natural beauty of Launceston's iconic Cataract Gorge. The photograph transports us to a serene scene where the majestic Alexandra Bridge spans across the tranquil waters of the First Basin. The bridge stands as a testament to human ingenuity against nature's grandeur. Its arches gracefully reflect in the calm water below, creating a mesmerizing symmetry that adds to its allure. Surrounded by lush greenery and rugged cliffs, this breathtaking view offers a glimpse into Tasmania's rich history and natural wonders. It is no wonder that Launceston has become such a popular tourist destination over the years. As we gaze at this historic snapshot, we can almost feel ourselves being transported back in time, immersing ourselves in the tranquility of this picturesque landscape. This photo serves as both a reminder of our connection with nature and an invitation for future explorers to discover their own moments of serenity amidst Launceston's stunning sights. With its timeless appeal and artistic composition, "Launceston: The First Basin and Alexandra Bridge" captures not only our attention but also our imagination - inviting us to delve deeper into Tasmania's fascinating past while appreciating its enduring beauty.
MADE IN THE USA
Safe Shipping with 30 Day Money Back Guarantee
FREE PERSONALISATION*
We are proud to offer a range of customisation features including Personalised Captions, Color Filters and Picture Zoom Tools
SECURE PAYMENTS
We happily accept a wide range of payment options so you can pay for the things you need in the way that is most convenient for you
* Options may vary by product and licensing agreement. Zoomed Pictures can be adjusted in the Cart.