
1899 1902 Collection (#8)

"1899-1902

Background image1899 1902 Collection: View from Spion Kop, South Africa, 2nd Boer War, 1901. Artist: Underwood & Underwood

View from Spion Kop, South Africa, 2nd Boer War, 1901. Artist: Underwood & Underwood
View from Spion Kop, South Africa, 2nd Boer War, 1901. Scene of Bullers terrific battles, Tugela River and Zwartz Kop from Spion Kop. Looking southeast

Background image1899 1902 Collection: British soldiers sleeping, South Africa, 2nd Boer War, 30 December 1900

British soldiers sleeping, South Africa, 2nd Boer War, 30 December 1900. Artist: Underwood & Underwood
British soldiers sleeping, South Africa, 2nd Boer War, 30 December 1900. Troops sleeping by their arms before Colesberg. Stereoscopic card. Detail

Background image1899 1902 Collection: British artillery in action, South Africa, 2nd Boer War, 6 February 1900

British artillery in action, South Africa, 2nd Boer War, 6 February 1900. Artist: Underwood & Underwood
British artillery in action, South Africa, 2nd Boer War, 6 February 1900. The famous Garrison Artillery saving the Modder River Bridge. Stereoscopic card. Detail

Background image1899 1902 Collection: In a British field hospital on the Tugela River, South Africa, 2nd Boer War, 1900

In a British field hospital on the Tugela River, South Africa, 2nd Boer War, 1900. Artist: Underwood & Underwood
In a British field hospital on the Tugela River, South Africa, 2nd Boer War, 1900. Stereoscopic card. Detail

Background image1899 1902 Collection: South African Light Horse, Cape Town, South Africa, 2nd Boer War, 1900

South African Light Horse, Cape Town, South Africa, 2nd Boer War, 1900. Artist: Underwood & Underwood
South African Light Horse, Cape Town, South Africa, 2nd Boer War, 1900. Men of the South African Light Horse coming down Adderley Street getting ready to entrain for the front

Background image1899 1902 Collection: Wiltshire boys stealing on the enemy at the Orange River, South Africa, 2nd Boer War, 1900

Wiltshire boys stealing on the enemy at the Orange River, South Africa, 2nd Boer War, 1900. Men of the Wiltshire Regiment in prone position in a skirmish line

Background image1899 1902 Collection: A desperate stand at the Modder River, South Africa, 2nd Boer War, 18 December 1899

A desperate stand at the Modder River, South Africa, 2nd Boer War, 18 December 1899. Artist: Underwood & Underwood
A desperate stand at the Modder River, South Africa, 2nd Boer War, 18 December 1899. British soldiers fighting protected by boulders. Stereoscopic card. Detail

Background image1899 1902 Collection: Gordon Highlanders embarking for South Africa, Liverpool, Lancashire, 1899

Gordon Highlanders embarking for South Africa, Liverpool, Lancashire, 1899. Artist: Underwood & Underwood
Gordon Highlanders embarking for South Africa, Liverpool, Lancashire, 1899. On their way to fight in the Second Boer War. Stereoscopic card. Detail

Background image1899 1902 Collection: Sir Alfred Milner, British statesman, 1900. Artist: Keystone View Company

Sir Alfred Milner, British statesman, 1900. Artist: Keystone View Company
Sir Alfred Milner, British statesman, 1900. Milner (1854-1925) was Governor of the Cape Colony and High Commissioner to Southern Africa from 1897-1901

Background image1899 1902 Collection: Louis Botha, Afrikaner soldier and statesman, 1900 (1951)

Louis Botha, Afrikaner soldier and statesman, 1900 (1951). Botha was Commander-in-chief of the Boer forces from 1900 during the 2nd Boer War (1899-1902)

Background image1899 1902 Collection: Signallers of the Yorkshire Regiment, New Zealand Hill, South Africa, Boer War

Signallers of the Yorkshire Regiment, New Zealand Hill, South Africa, Boer War, 1900Artist: Underwood & Underwood
Signallers of the Yorkshire Regiment, New Zealand Hill, South Africa, Boer War, 1900. Yorkshire signaling from New Zealand Hill, held after their commanders had Fallen, Jan 14th, to Rensburg

Background image1899 1902 Collection: The Pretoria mint before it was taken over by the British, Transvaal, South Africa, 1900

The Pretoria mint before it was taken over by the British, Transvaal, South Africa, 1900. The capital of the South African Republic (Transvaal) during the Boer War

Background image1899 1902 Collection: British treatment of Boer women and children, 1900

British treatment of Boer women and children, 1900. The Boer War saw the first use of the internment of civilians in camps in wartime

Background image1899 1902 Collection: Soldiers of the 18th Hussars on the train to Pretoria, South Africa, Boer War, 1900

Soldiers of the 18th Hussars on the train to Pretoria, South Africa, Boer War, 1900. A print from Black and White Budget Vol III, WJP Monckton, London, April 28th 1900

Background image1899 1902 Collection: Lord Roberts entering Pretoria, Boer War, South Africa, 1900 (1925)

Lord Roberts entering Pretoria, Boer War, South Africa, 1900 (1925). Pretoria, the Boer capital of the South African Republic (Transvaal)

Background image1899 1902 Collection: Storming of the Boer kopje by the Suffolks at Colesberg, South Africa, Boer War, 1900

Storming of the Boer kopje by the Suffolks at Colesberg, South Africa, Boer War, 1900. Artist: Underwood & Underwood
Storming of the Boer kopje by the Suffolks at Colesberg, South Africa, Boer War, 1900. The area around Colesberg in the northern Cape Colony was the site of fierce fighting in early 1900

Background image1899 1902 Collection: Gordon Highland signallers on Signal Hill, Euslin, South Africa, Boer War, 1899-1902

Gordon Highland signallers on Signal Hill, Euslin, South Africa, Boer War, 1899-1902. Artist: Underwood & Underwood
Gordon Highland signallers on Signal Hill, Euslin, South Africa, Boer War, 1899-1902. Stereoscopic card detail

Background image1899 1902 Collection: British soldiers reviewed by Lord Roberts, Public Square, Pretoria, South Africa, Boer War, 1900

British soldiers reviewed by Lord Roberts, Public Square, Pretoria, South Africa, Boer War, 1900. Stereoscopic card detail

Background image1899 1902 Collection: On the Fighting Line with the Queens Finest, Modder River, South Africa, Boer War, 1899-1902

On the Fighting Line with the Queens Finest, Modder River, South Africa, Boer War, 1899-1902. Stereoscopic card detail

Background image1899 1902 Collection: Lord Roberts, Commander in Chief of British Armies, South Africa, Boer War, 1900-1901

Lord Roberts, Commander in Chief of British Armies, South Africa, Boer War, 1900-1901. Artist: Underwood & Underwood
Lord Roberts, Commander in Chief of British Armies, South Africa, Boer War, 1900-1901. Frederick Sleigh Roberts was appointed commander of the British forces in South Africa

Background image1899 1902 Collection: Intombi Cemetery, Ladysmith, Natal, South Africa. Artist: Excelsior Stereoscopic Tours

Intombi Cemetery, Ladysmith, Natal, South Africa. Artist: Excelsior Stereoscopic Tours
Intombi Cemetery, Ladysmith, Natal, South Africa. The graves of casualties of the Siege of Ladysmith (October 1899 - February 1900) during the Boer War. Stereoscopic card detail

Background image1899 1902 Collection: Drawing room of the Presidency, Lord Roberts headquarters, Bloemfontein, South Africa, 1900

Drawing room of the Presidency, Lord Roberts headquarters, Bloemfontein, South Africa, 1900. Lord Roberts took command of British forces fighting in the Boer War in 1900

Background image1899 1902 Collection: Soldier who fell at the front, Wynberg Hospital, Cape Town, South Africa, Boer War, 1899-1902

Soldier who fell at the front, Wynberg Hospital, Cape Town, South Africa, Boer War, 1899-1902. Stereoscopic card detail

Background image1899 1902 Collection: Oom-poleon Boer-naparte on Board the Highbury Castle, 1901

Oom-poleon Boer-naparte on Board the Highbury Castle, 1901. Cartoon depicting the Boer leader Paul Kruger, know by the nickname Oom (uncle) Paul

Background image1899 1902 Collection: The Club which was struck by a 94lb Boer shell, siege of Mafeking, South Africa, 1901

The Club which was struck by a 94lb Boer shell, siege of Mafeking, South Africa, 1901. Artist: Underwood & Underwood
The Club which was struck by a 94lb Boer shell, siege of Mafeking, South Africa, 1901. Under the command of Colonel Robert Baden-Powell (1857-1941)

Background image1899 1902 Collection: British heliographing from the Johannesburg Fort the news of the occupation, Boer war, 1900

British heliographing from the Johannesburg Fort the news of the occupation, Boer war, 1900. Johannesburg was captured by the British on 31st May 1900

Background image1899 1902 Collection: Camp alarm at Honey Nest Kloof, South Africa, 1900. Artist: Underwood & Underwood

Camp alarm at Honey Nest Kloof, South Africa, 1900. Artist: Underwood & Underwood
Camp alarm at Honey Nest Kloof, South Africa, 1900. The battery repulsed a Boer attack on 12th February. Stereoscopic card

Background image1899 1902 Collection: Christmas presents from home, to the troops with Methuen at Modder River, South Africa, 1900

Christmas presents from home, to the troops with Methuen at Modder River, South Africa, 1900. Stereoscopic card. British troops serving in the Boer War receiving Christmas parcels

Background image1899 1902 Collection: The sad roll call after some of the British were cut off at Dordrecht, 30th December 1900

The sad roll call after some of the British were cut off at Dordrecht, 30th December 1900
The sad roll call after some of the British were cut off at Dordrecht, South Africa, 30th December 1900. Scene from the Boer War. Some of the soldiers appear to be dead or wounded. Stereoscopic card

Background image1899 1902 Collection: Pontoon bridge across the Modder River, Boer War, South Africa, 1900. Artist: Underwood & Underwood

Pontoon bridge across the Modder River, Boer War, South Africa, 1900. Artist: Underwood & Underwood
Pontoon bridge across the Modder River, Boer War, South Africa, 1900. The bridge was built by the Royal Engineers in just two hours. Stereoscopic card

Background image1899 1902 Collection: Pom-pom bridge and Boer headquarters telegraph station, Tugela River, Natal, South Africa, 1901

Pom-pom bridge and Boer headquarters telegraph station, Tugela River, Natal, South Africa, 1901. Stereoscopic card

Background image1899 1902 Collection: 10th Hussars after repulsing a Boer attack, Colesberg, South Africa, 4th January 1900

10th Hussars after repulsing a Boer attack, Colesberg, South Africa, 4th January 1900. Artist: Underwood & Underwood
10th Hussars after repulsing a Boer attack, Colesberg, South Africa, 4th January 1900. Stereoscopic card

Background image1899 1902 Collection: The Warwicks skirmishing with Boers near Weppener, east of Bloemfontein, South Africa, 1901

The Warwicks skirmishing with Boers near Weppener, east of Bloemfontein, South Africa, 1901. Stereoscopic card

Background image1899 1902 Collection: Tons upon tons of oats for Tommys faithful friend, De Aar, South Africa, Boer War, 1900

Tons upon tons of oats for Tommys faithful friend, De Aar, South Africa, Boer War, 1900. Artist: Underwood & Underwood
Tons upon tons of oats for Tommys faithful friend, De Aar, South Africa, Boer War, 1900. Stereoscopic card

Background image1899 1902 Collection: Field Marshal Lord Roberts and Major General Baden-Powell, Pretoria, South Africa, 1901

Field Marshal Lord Roberts and Major General Baden-Powell, Pretoria, South Africa, 1901. Artist: Underwood & Underwood
Field Marshal Lord Roberts and Major General Baden-Powell, Pretoria, South Africa, 1901. Roberts escorting Baden-Powell to his headquarters to be presented with honours for commanding Mafekings

Background image1899 1902 Collection: South slope of Spion Kop, South Africa, Boer War, 1901. Artist: Underwood & Underwood

South slope of Spion Kop, South Africa, Boer War, 1901. Artist: Underwood & Underwood
South slope of Spion Kop, South Africa, Boer War, 1901. In January 1900, the hill of Spion Kop was the scene of a major defeat for the British army under General Sir Redvers Buller at the hands of

Background image1899 1902 Collection: First aid to a wounded fusilier, Honey Nest Kloof Battle, Boer War, South Africa, February 1900

First aid to a wounded fusilier, Honey Nest Kloof Battle, Boer War, South Africa, February 1900
First aid to a wounded fusilier, Honey Nest Kloof Battle, Boer War, South Africa, 13th February 1900. Stereoscopic card

Background image1899 1902 Collection: Shoeing horses at Naauwpoort, South Africa, Boer War, 1900. Artist: Underwood & Underwood

Shoeing horses at Naauwpoort, South Africa, Boer War, 1900. Artist: Underwood & Underwood
Shoeing horses at Naauwpoort, South Africa, Boer War, 1900. Stereoscopic card

Background image1899 1902 Collection: Training one of HMS Monarchs 4. 7 inch guns on the Pretoria forts, South Africa, 4th June 1900

Training one of HMS Monarchs 4. 7 inch guns on the Pretoria forts, South Africa, 4th June 1900
Training one of HMS Monarchs 4.7 inch guns on the Pretoria forts, Boer War, South Africa, 4th June 1900. Pretoria, the Boer capital of the South African Republic (Transvaal)

Background image1899 1902 Collection: Fording the Modder River, Boer War, South Africa, 15th February 1901. Artist: Underwood & Underwood

Fording the Modder River, Boer War, South Africa, 15th February 1901. Artist: Underwood & Underwood
Fording the Modder River, Boer War, South Africa, 15th February 1901. Supplies being brought across after the crossing was forced by Major-General John Frenchs 1st Cavalry Brigade. Stereoscopic card

Background image1899 1902 Collection: Inspection of the Cheshire Regiment in the fort at Johannesburg, Boer War, South Africa, 1901

Inspection of the Cheshire Regiment in the fort at Johannesburg, Boer War, South Africa, 1901. Stereoscopic card

Background image1899 1902 Collection: Boer War, South Africa, 1900. Artist: Underwood & Underwood

Boer War, South Africa, 1900. Artist: Underwood & Underwood
Boer War, South Africa, 1900. British mounted infantry feeling for the enemy nine miles south of Pretoria, on the morning of 4th June. Stereoscopic card

Background image1899 1902 Collection: 84th Battery and Balloon Corps, Boer War, South Africa, 1901. Artist: Underwood & Underwood

84th Battery and Balloon Corps, Boer War, South Africa, 1901. Artist: Underwood & Underwood
84th Battery and Balloon Corps, Boer War, South Africa, 1901. Troops of Field Marshal Lord Roberts army advancing towards Johannesburg. Stereoscopic card

Background image1899 1902 Collection: The dying buglers last call, a battlefield incident, Gras Pan, South Africa, 1900

The dying buglers last call, a battlefield incident, Gras Pan, South Africa, 1900. Artist: Underwood & Underwood
The dying buglers last call, a battlefield incident, Gras Pan, South Africa, 1900. Stereoscopic card

Background image1899 1902 Collection: Making gas for one of the war balloons at Slingersfontein, South Africa, Boer War, 1900

Making gas for one of the war balloons at Slingersfontein, South Africa, Boer War, 1900. Artist: Underwood & Underwood
Making gas for one of the war balloons at Slingersfontein, South Africa, Boer War, 1900. The balloons were used to observe the movements of the enemy. Stereoscopic card

Background image1899 1902 Collection: Field Marshal Lord Roberts and staff cheering the Queen, Pretoria, South Africa, 5th June 1900

Field Marshal Lord Roberts and staff cheering the Queen, Pretoria, South Africa, 5th June 1900. Raising the Union Jack on the occupation of Pretoria

Background image1899 1902 Collection: The gallant Guards Brigade marching on Brandfort, Boer War, South Africa, 1901

The gallant Guards Brigade marching on Brandfort, Boer War, South Africa, 1901. Artist: Underwood & Underwood
The gallant Guards Brigade marching on Brandfort, Boer War, South Africa, 1901. Stereoscopic card

Background image1899 1902 Collection: Major-General John French, the intrepid cavalry leader, Pretoria, South Africa, Boer War, 1901

Major-General John French, the intrepid cavalry leader, Pretoria, South Africa, Boer War, 1901. French commanded the British 1st Cavalry Brigade in the Second Boer War


For sale as Licensed Images

Choose your image, Select your licence and Download the media

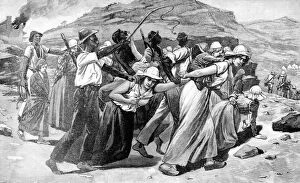
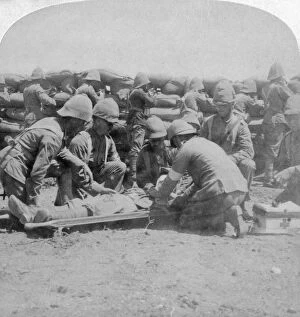
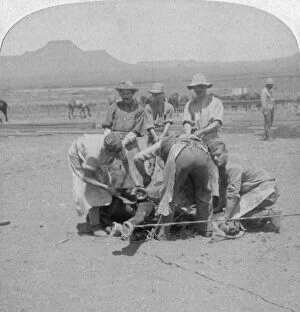
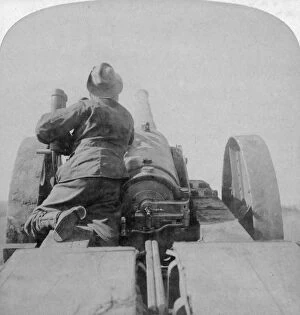
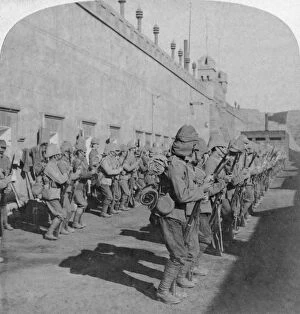
"1899-1902: A Glimpse into the Heroic Era of British Soldiers" Step back in time to witness the valor and courage displayed by English soldiers during the tumultuous years of 1899-1902. Among these remarkable figures was Robert Stephenson Smyth Baden-Powell, lst Viscount Baden-Powell, an English soldier who left an indelible mark on history. As a Household Cavalry-Captain in the 2nd Life Guards, he exemplified bravery and leadership. The Cape Town Highlanders stood tall amidst adversity in 1900, as captured by JE Bruton's artwork. Their unwavering spirit symbolized resilience against all odds. Lord Methuen's rallying of his broken forces at Tweebosch in 1902, depicted by Charles Mills Sheldon, showcased determination even when faced with defeat. In another awe-inspiring moment from this era, witness The Night Charge of the 19th Hussars Near Lydenberg on Nov. 7th 1900. This breathtaking scene immortalizes their fearless charge under fire – a testament to their unyielding loyalty. Major-General Hector A. Macdonald stands proud in Heath's portrait from 1900; his distinguished service earned him great respect among his comrades-in-arms. Horatio Herbert Kitchener further solidifies this era's legacy as a British Field Marshal and diplomat whose accomplishments echo through time. General Sir Bindon Blood commands attention with his authoritative presence captured in a striking photograph from 1902 – a true embodiment of military prowess and strategic brilliance. However, not all moments were victories for the British forces; General Methuen surrendering to de la Rey on March 7th, 1902 marked a significant turning point during the Boer War – reminding us that even heroes face setbacks along their path to glory. John Charlton's masterpiece "The Fight at Brakenlaagte.