
Crewelwork Collection (#3)
"Crewelwork: A Tapestry of Intrigue and Betrayal" In the intricate threads of wool embroidery on linen


For sale as Licensed Images
Choose your image, Select your licence and Download the media
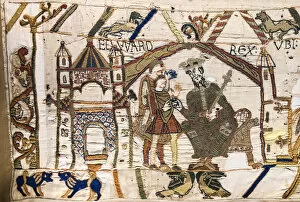
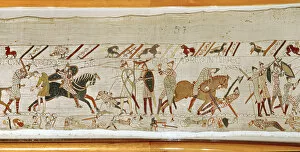
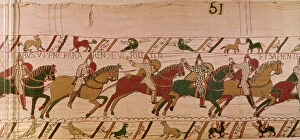
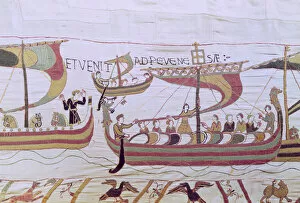
"Crewelwork: A Tapestry of Intrigue and Betrayal" In the intricate threads of wool embroidery on linen, the Bayeux Tapestry tells a captivating tale of Harold's fateful journey. Harold's ships, battered by fierce winds, are blown into the territory of Count Guy of Ponthieu. The vibrant colors depict the treacherous sea that led him to unexpected shores. Meanwhile, Duke William of Normandy rides forth to welcome his unwitting guest. The tapestry captures the grandeur and pomp as he extends his hand in friendship, unaware of what lies ahead. Before departing for Normandy, Harold seeks solace at Bosham church. With bowed head and folded hands, he prays for guidance in this perilous endeavor. The scene shifts to Duke Conan of Brittany offering William the keys to Dinan, and is a gesture filled with honor and respect as alliances are forged amidst uncertain times. William leads his army towards Brittany but encounters an unforeseen obstacle - quicksand. The tapestry showcases their struggle as they fight against nature's grip. Amidst this chaos, armed riders from Duke William arrive to escort Harold back to him. Their presence signifies both protection and captivity in equal measure. Count Guy's soldiers seize Harold upon his arrival in Normandy. Bound by fate or perhaps betrayal? The tapestry leaves us pondering over these intricate webs woven through history. Count Guy himself takes charge and leads Harold towards William - a pawn caught between two powerful forces locked in rivalry. Will he be used as leverage or something more sinister? Once again we witness Harold's ships being blown off course onto Count Guy's territory - a cruel twist that seems almost orchestrated by destiny itself. Duke William's messengers finally arrive at Beaurain Castle where negotiations take place behind closed doors. What secrets lie within those stone walls? Only time will reveal their true intentions. Amongst all this turmoil, a figure stands out.