
Queensway Tunnel Collection

Discover the rich history of Queensway Tunnel, a marvel of engineering and transportation

Background imageQueensway Tunnel Collection: Cast iron tunnel lining MTA01_01_16

Cast iron tunnel lining MTA01_01_16
QUEENSWAY TUNNEL, LIVERPOOL, Merseyside. A man at work on the construction of the Queensway Tunnel, showing the cast iron lining in the under-river section of the main tunnel

Background imageQueensway Tunnel Collection: Constructing the Mersey tunnel MTA01_02_03

Constructing the Mersey tunnel MTA01_02_03
MERSEY TUNNEL, LIVERPOOL, Merseyside. Men working on the construction of the Queensway Tunnel, showing the section beneath Neptune Yard. The print is annotated: Contract No. 3, and Rendel St Line

Background imageQueensway Tunnel Collection: Opening ceremony MTA01_01_34

Opening ceremony MTA01_01_34
QUEENSWAY TUNNEL, LIVERPOOL, Merseyside. A view from Old Haymarket showing crowds gathered to watch the opening of the Queensway Tunnel

Background imageQueensway Tunnel Collection: Royal opening MTA01_01_35

Royal opening MTA01_01_35
QUEENSWAY TUNNEL, LIVERPOOL, Merseyside. The opening ceremony of the Queensway Tunnel, showing King George V pressing the button to raise the curtains to the tunnel entrance

Background imageQueensway Tunnel Collection: Newly finished tunnel MTA01_01_32

Newly finished tunnel MTA01_01_32
QUEENSWAY TUNNEL, LIVERPOOL, Merseyside. A view of the newly completed Queensway Tunnel, looking around a curve of the Dock Branch Tunnel. The print is annotated: 26 6" Internal Dia

Background imageQueensway Tunnel Collection: Newly finished tunnel MTA01_01_30

Newly finished tunnel MTA01_01_30
QUEENSWAY TUNNEL, LIVERPOOL, Merseyside. Interior view looking along the roadway of the newly completed Queensway Tunnel. The print is annotated: Completed 44ft. Internal Dia. Tunnel under River

Background imageQueensway Tunnel Collection: Ventilation station construction MTA01_01_26

Ventilation station construction MTA01_01_26
QUEENSWAY TUNNEL, LIVERPOOL, Merseyside. Interior view of the Queensway Tunnel during construction, showing men working on the Brethren Buildings Ventilation Station

Background imageQueensway Tunnel Collection: Constructing the tunnel MTA01_01_23

Constructing the tunnel MTA01_01_23
QUEENSWAY TUNNEL, LIVERPOOL, Merseyside. Men at work during the construction of the Queensway Tunnel, showing the reinforcement bars in the sidewalks in the under river section

Background imageQueensway Tunnel Collection: Subsidence prevention MTA01_01_17

Subsidence prevention MTA01_01_17
QUEENSWAY TUNNEL, LIVERPOOL, Merseyside. Men at work on the construction of the Queensway Tunnel, showing the shield under Dale Street, constructed to prevent subsidence

Background imageQueensway Tunnel Collection: Excavating a junction chamber MTA01_01_13

Excavating a junction chamber MTA01_01_13
QUEENSWAY TUNNEL, LIVERPOOL, Merseyside. Men at work on the excavation of a junction chamber during the construction of the Queensway Tunnel. The print is annotated: Contract No

Background imageQueensway Tunnel Collection: Grummetting and tightening MTA01_01_11

Grummetting and tightening MTA01_01_11
QUEENSWAY TUNNEL, LIVERPOOL, Merseyside. A workman grummetting and tightening bolts during the construction of the Queensway Tunnel. The print is annotated: Contract No

Background imageQueensway Tunnel Collection: Excavating the lower half MTA01_01_10

Excavating the lower half MTA01_01_10
QUEENSWAY TUNNEL, LIVERPOOL, Merseyside. A view of the partially constructed Queensway Tunnel, showing a group of workmen excavating the lower half of the main tunnel

Background imageQueensway Tunnel Collection: Beneath the road deck MTA01_01_06

Beneath the road deck MTA01_01_06
QUEENSWAY TUNNEL, LIVERPOOL, Merseyside. Workmen standing in the bottom part of the the partially constructed Queensway Tunnel, beneath an experimental length of reinforced concrete

Background imageQueensway Tunnel Collection: Experimental roadway MTA01_01_05

Experimental roadway MTA01_01_05
QUEENSWAY TUNNEL, LIVERPOOL, Merseyside. Two men working on the construction of an experimental length of roadway in the Queensway Tunnel. The print is annotated: Contract No

Background imageQueensway Tunnel Collection: Concrete block lining MTA01_01_02

Concrete block lining MTA01_01_02
QUEENSWAY TUNNEL, LIVERPOOL, Merseyside. Men at work in the Queensway Tunnel laying the concrete block lining in the New Quay section. The print is annotated: Contract No

Background imageQueensway Tunnel Collection: Mersey Tunnel: Plastering of the Main Arch (b / w photo)

Mersey Tunnel: Plastering of the Main Arch (b / w photo)
6022577 Mersey Tunnel: Plastering of the Main Arch (b/w photo) by English Photographer, (20th century); Private Collection; (add.info.: Plastering of the Main Arch)

Background imageQueensway Tunnel Collection: Mersey Tunnel: Reinforced Roadway ready for Concreting (b / w photo)

Mersey Tunnel: Reinforced Roadway ready for Concreting (b / w photo)
6022564 Mersey Tunnel: Reinforced Roadway ready for Concreting (b/w photo) by English Photographer, (20th century); Private Collection; (add.info.: Reinforced Roadway ready for Concreting)

Background imageQueensway Tunnel Collection: Mersey Tunnel: Roadway Construction under Land Portions of Main Tunnel (b / w photo)

Mersey Tunnel: Roadway Construction under Land Portions of Main Tunnel (b / w photo)
6022562 Mersey Tunnel: Roadway Construction under Land Portions of Main Tunnel (b/w photo) by English Photographer, (20th century); Private Collection; (add.info)

Background imageQueensway Tunnel Collection: Mersey Tunnel: Roadway Construction in one of the Junction Chambers (b / w photo)

Mersey Tunnel: Roadway Construction in one of the Junction Chambers (b / w photo)
6022560 Mersey Tunnel: Roadway Construction in one of the Junction Chambers (b/w photo) by English Photographer, (20th century); Private Collection; (add.info)

Background imageQueensway Tunnel Collection: The Mersey Tunnel Entrance, Kings Square, Birkenhead (b / w photo)

The Mersey Tunnel Entrance, Kings Square, Birkenhead (b / w photo)
6022584 The Mersey Tunnel Entrance, Kings Square, Birkenhead (b/w photo) by English Photographer, (20th century); Private Collection; (add.info.: The Mersey Tunnel Entrance, Kings Square, Birkenhead)

Background imageQueensway Tunnel Collection: Mersey Tunnel: Cement Gunning completed (b / w photo)

Mersey Tunnel: Cement Gunning completed (b / w photo)
6022570 Mersey Tunnel: Cement Gunning completed (b/w photo) by English Photographer, (20th century); Private Collection; (add.info.: Cement Gunning completed)

Background imageQueensway Tunnel Collection: Mersey Tunnel: The Ventilating Stations (b / w photo)

Mersey Tunnel: The Ventilating Stations (b / w photo)
6022566 Mersey Tunnel: The Ventilating Stations (b/w photo) by English Photographer, (20th century); Private Collection; (add.info.: The Ventilating Stations)

Background imageQueensway Tunnel Collection: Mersey Tunnel: Excavation in one of the Junction Chambers (b / w photo)

Mersey Tunnel: Excavation in one of the Junction Chambers (b / w photo)
6022559 Mersey Tunnel: Excavation in one of the Junction Chambers (b/w photo) by English Photographer, (20th century); Private Collection; (add.info.: Excavation in one of the Junction Chambers)

Background imageQueensway Tunnel Collection: Mersey Tunnel: Cast-Iron Lining in Under-River Section of Main Tunnel (b / w photo)

Mersey Tunnel: Cast-Iron Lining in Under-River Section of Main Tunnel (b / w photo)
6022557 Mersey Tunnel: Cast-Iron Lining in Under-River Section of Main Tunnel (b/w photo) by English Photographer, (20th century); Private Collection; (add.info)

Background imageQueensway Tunnel Collection: Mersey Tunnel, Queensway (litho)

Mersey Tunnel, Queensway (litho)
6022548 Mersey Tunnel, Queensway (litho) by English School, (20th century); Private Collection; (add.info.: Mersey Tunnel, Queensway)

Background imageQueensway Tunnel Collection: The Mersey Tunnel, Mid-River Section (b / w photo)

The Mersey Tunnel, Mid-River Section (b / w photo)
6022579 The Mersey Tunnel, Mid-River Section (b/w photo) by English Photographer, (20th century); Private Collection; (add.info.: The Mersey Tunnel, Mid-River Section)

Background imageQueensway Tunnel Collection: Mersey Tunnel: Construction of the Rendel Street Branch Tunnel (b / w photo)

Mersey Tunnel: Construction of the Rendel Street Branch Tunnel (b / w photo)
6022576 Mersey Tunnel: Construction of the Rendel Street Branch Tunnel (b/w photo) by English Photographer, (20th century); Private Collection; (add.info)

Background imageQueensway Tunnel Collection: Mersey Tunnel: Fresh Air Ducts under the Roadway (b / w photo)

Mersey Tunnel: Fresh Air Ducts under the Roadway (b / w photo)
6022575 Mersey Tunnel: Fresh Air Ducts under the Roadway (b/w photo) by English Photographer, (20th century); Private Collection; (add.info.: Fresh Air Ducts under the Roadway)

Background imageQueensway Tunnel Collection: Mersey Tunnel: Fresh Air Duct in Main Tunnel under Land (b / w photo)

Mersey Tunnel: Fresh Air Duct in Main Tunnel under Land (b / w photo)
6022572 Mersey Tunnel: Fresh Air Duct in Main Tunnel under Land (b/w photo) by English Photographer, (20th century); Private Collection; (add.info.: Fresh Air Duct in Main Tunnel under Land)

Background imageQueensway Tunnel Collection: Mersey Tunnel: Preparation for Cement Gunning in the Main Tunnel (b / w photo)

Mersey Tunnel: Preparation for Cement Gunning in the Main Tunnel (b / w photo)
6022565 Mersey Tunnel: Preparation for Cement Gunning in the Main Tunnel (b/w photo) by English Photographer, (20th century); Private Collection; (add.info)

Background imageQueensway Tunnel Collection: Mersey Tunnel: The Completed Roadway in the Main Tunnel (b / w photo)

Mersey Tunnel: The Completed Roadway in the Main Tunnel (b / w photo)
6022563 Mersey Tunnel: The Completed Roadway in the Main Tunnel (b/w photo) by English Photographer, (20th century); Private Collection; (add.info.: The Completed Roadway in the Main Tunnel)

Background imageQueensway Tunnel Collection: Mersey Tunnel: Erection of Cast-Iron Lining (b / w photo)

Mersey Tunnel: Erection of Cast-Iron Lining (b / w photo)
6022547 Mersey Tunnel: Erection of Cast-Iron Lining (b/w photo) by English Photographer, (20th century); Private Collection; (add.info.: Erection of Cast-Iron Lining)

Background imageQueensway Tunnel Collection: Mersey Tunnel: The Main Tunnel showing Pilot Headings reinforced under Glacial Channel (b / w photo)

Mersey Tunnel: The Main Tunnel showing Pilot Headings reinforced under Glacial Channel (b / w photo)
6022546 Mersey Tunnel: The Main Tunnel showing Pilot Headings reinforced under Glacial Channel (b/w photo) by English Photographer

Background imageQueensway Tunnel Collection: Mersey Tunnel: Excavation of the Pilot Headings (b / w photo)

Mersey Tunnel: Excavation of the Pilot Headings (b / w photo)
6022540 Mersey Tunnel: Excavation of the Pilot Headings (b/w photo) by English Photographer, (20th century); Private Collection; (add.info.: Excavation of the Pilot Headings)

Background imageQueensway Tunnel Collection: Mersey Tunnel: The Completed Plastering (b / w photo)

Mersey Tunnel: The Completed Plastering (b / w photo)
6022578 Mersey Tunnel: The Completed Plastering (b/w photo) by English Photographer, (20th century); Private Collection; (add.info.: The Completed Plastering)

Background imageQueensway Tunnel Collection: Mersey Tunnel: The Ventilating Stations (b / w photo)

Mersey Tunnel: The Ventilating Stations (b / w photo)
6022567 Mersey Tunnel: The Ventilating Stations (b/w photo) by English Photographer, (20th century); Private Collection; (add.info.: The Ventilating Stations)

Background imageQueensway Tunnel Collection: Mersey Tunnel: Diagram of the Pilot Headings and Working Shafts (litho)

Mersey Tunnel: Diagram of the Pilot Headings and Working Shafts (litho)
6022558 Mersey Tunnel: Diagram of the Pilot Headings and Working Shafts (litho) by English School, (20th century); Private Collection; (add.info.: Diagram of the Pilot Headings and Working Shafts)

Background imageQueensway Tunnel Collection: Mersey Tunnel: Change-Over from Circular to Inverted Tunnel (b / w photo)

Mersey Tunnel: Change-Over from Circular to Inverted Tunnel (b / w photo)
6022554 Mersey Tunnel: Change-Over from Circular to Inverted Tunnel (b/w photo) by English Photographer, (20th century); Private Collection; (add.info.: Change-Over from Circular to Inverted Tunnel)

Background imageQueensway Tunnel Collection: Invert over the Mersey Railway Tunnel, Birkenhead (b / w photo)

Invert over the Mersey Railway Tunnel, Birkenhead (b / w photo)
6022552 Invert over the Mersey Railway Tunnel, Birkenhead (b/w photo) by English Photographer, (20th century); Private Collection; (add.info.: Invert over the Mersey Railway Tunnel, Birkenhead)

Background imageQueensway Tunnel Collection: Mersey Tunnel: Excavation and Erection of Steel Ribs in one of the 'Break ups'(b / w photo)

Mersey Tunnel: Excavation and Erection of Steel Ribs in one of the "Break ups"(b / w photo)
6022551 Mersey Tunnel: Excavation and Erection of Steel Ribs in one of the " Break ups" (b/w photo) by English Photographer

Background imageQueensway Tunnel Collection: Mersey Tunnel: Excavation of Lower Half of the Main Tunnel (b / w photo)

Mersey Tunnel: Excavation of Lower Half of the Main Tunnel (b / w photo)
6022550 Mersey Tunnel: Excavation of Lower Half of the Main Tunnel (b/w photo) by English Photographer, (20th century); Private Collection; (add.info.: Excavation of Lower Half of the Main Tunnel)

Background imageQueensway Tunnel Collection: The Mersey Tunnel (b / w photo)

The Mersey Tunnel (b / w photo)
6022545 The Mersey Tunnel (b/w photo) by English Photographer, (20th century); Private Collection; (add.info.: The Mersey Tunnel)

Background imageQueensway Tunnel Collection: The Mersey Tunnel Entrance, Kingsway, Liverpool (b / w photo)

The Mersey Tunnel Entrance, Kingsway, Liverpool (b / w photo)
6022543 The Mersey Tunnel Entrance, Kingsway, Liverpool (b/w photo) by English Photographer, (20th century); Private Collection; (add.info.: The Mersey Tunnel Entrance, Kingsway, Liverpool)

Background imageQueensway Tunnel Collection: Mersey Tunnel: Reinforcing Shield under Dale Street, Liverpool (b / w photo)

Mersey Tunnel: Reinforcing Shield under Dale Street, Liverpool (b / w photo)
6022574 Mersey Tunnel: Reinforcing Shield under Dale Street, Liverpool (b/w photo) by English Photographer, (20th century); Private Collection; (add.info.: Reinforcing Shield under Dale Street)

Background imageQueensway Tunnel Collection: Mersey Tunnel: An Outsize Load awaiting Convoy (b / w photo)

Mersey Tunnel: An Outsize Load awaiting Convoy (b / w photo)
6022573 Mersey Tunnel: An Outsize Load awaiting Convoy (b/w photo) by English Photographer, (20th century); Private Collection; (add.info.: An Outsize Load awaiting Convoy)

Background imageQueensway Tunnel Collection: Mersey Tunnel: Exhaust Receiver Chamber before Concreting (b / w photo)

Mersey Tunnel: Exhaust Receiver Chamber before Concreting (b / w photo)
6022571 Mersey Tunnel: Exhaust Receiver Chamber before Concreting (b/w photo) by English Photographer, (20th century); Private Collection; (add.info.: Exhaust Receiver Chamber before Concreting)

Background imageQueensway Tunnel Collection: Mersey Tunnel: Blowing Fan and Casing, Georges Dock Building, Liverpool (b / w photo)

Mersey Tunnel: Blowing Fan and Casing, Georges Dock Building, Liverpool (b / w photo)
6022569 Mersey Tunnel: Blowing Fan and Casing, Georges Dock Building, Liverpool (b/w photo) by English Photographer, (20th century); Private Collection; (add.info.: Blowing Fan and Casing)

Background imageQueensway Tunnel Collection: Mersey Tunnel: Contruction of Reinforced Concrete Roadway (b / w photo)

Mersey Tunnel: Contruction of Reinforced Concrete Roadway (b / w photo)
6022561 Mersey Tunnel: Contruction of Reinforced Concrete Roadway (b/w photo) by English Photographer, (20th century); Private Collection; (add.info.: Contruction of Reinforced Concrete Roadway)


For sale as Licensed Images

Choose your image, Select your licence and Download the media

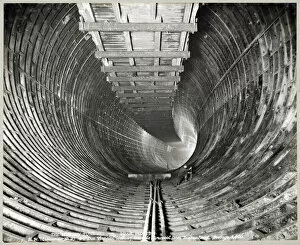
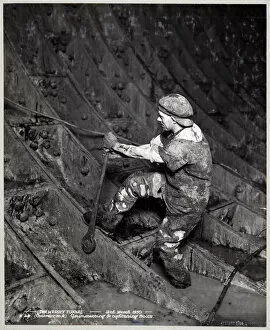
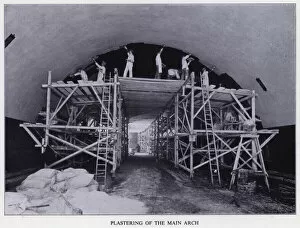
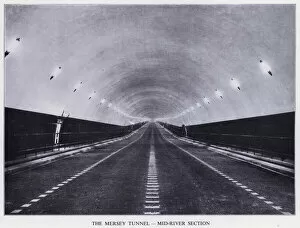
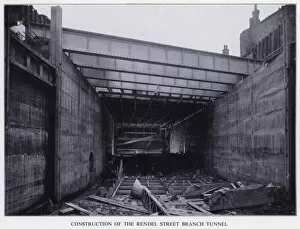
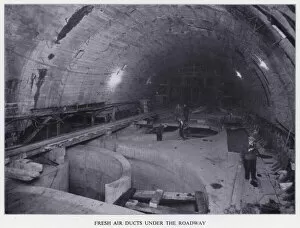
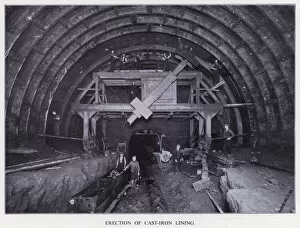
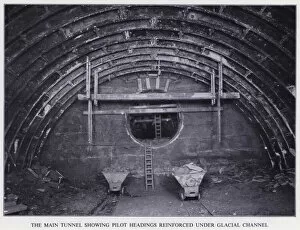
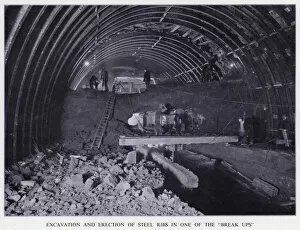
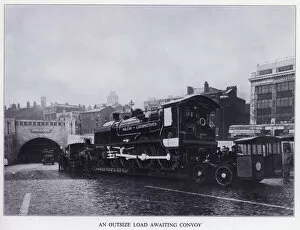
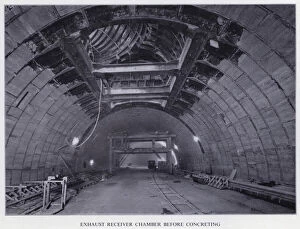
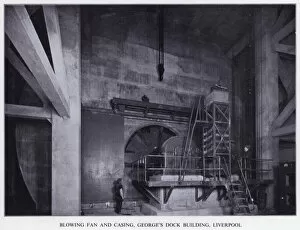
Discover the rich history of Queensway Tunnel, a marvel of engineering and transportation. 🚇✨ Constructed with cast iron tunnel lining, the Queensway Tunnel (MTA01_01_16) stands as a testament to human ingenuity. Step back in time and witness the incredible efforts behind its creation during 'Constructing the Mersey tunnel' (MTA01_02_03). Feel the excitement in the air as you relive the grand Opening Ceremony (MTA01_01_34), followed by its Royal opening (MTA01_01_35). The newly finished tunnel (MTA01_01_32) is a sight to behold, showcasing meticulous craftsmanship and attention to detail. Marvel at the Ventilation Station Construction (MTA01_01_26), an essential component ensuring safe passage for all travelers. Explore how engineers overcame challenges during 'Constructing the Tunnel' (MTA01-1-23), employing innovative techniques for subsidence prevention (MTA 1-17). Delve into every stage of construction, from excavating junction chambers (MTA 1-13) to grummetting and tightening processes (MTA 1-11). Witness firsthand how they meticulously excavated the lower half of this remarkable structure (MTA 1-10). Queensway Tunnel has stood strong through generations, connecting people and places. Immerse yourself in its captivating story today.