
Whole Car Collection

"Capturing the Essence

Background imageWhole Car Collection: Williams FW16 1994 rear suspension detail view: MOTORSPORT IMAGES

Williams FW16 1994 rear suspension detail view: MOTORSPORT IMAGES: Williams FW16 1994 rear suspension detail view
MOTORSPORT IMAGES: Williams FW16 1994 rear suspension detail view. (Illustration by Giorgio Piola/Motorsport Images)

Background imageWhole Car Collection: Ferrari F399 3 / 4 view: MOTORSPORT IMAGES: Ferrari F399 3 / 4 view

Ferrari F399 3 / 4 view: MOTORSPORT IMAGES: Ferrari F399 3 / 4 view
MOTORSPORT IMAGES: Ferrari F399 3/4 view. (Illustration by Giorgio Piola/Motorsport Images)

Background imageWhole Car Collection: DUPLICATE: Williams FW26 Walrus nose: MOTORSPORT IMAGES: DUPLICATE: Williams FW26 Walrus nose

DUPLICATE: Williams FW26 Walrus nose: MOTORSPORT IMAGES: DUPLICATE: Williams FW26 Walrus nose
MOTORSPORT IMAGES: DUPLICATE: Williams FW26 Walrus nose. (Illustration by Giorgio Piola/Motorsport Images)

Background imageWhole Car Collection: Red Bull RB5 3 / 4 view: MOTORSPORT IMAGES: Red Bull RB5 3 / 4 view

Red Bull RB5 3 / 4 view: MOTORSPORT IMAGES: Red Bull RB5 3 / 4 view
MOTORSPORT IMAGES: Red Bull RB5 3/4 view. (Illustration by Giorgio Piola/Motorsport Images)

Background imageWhole Car Collection: Force India VJM02 side view: MOTORSPORT IMAGES: Force India VJM02 side view

Force India VJM02 side view: MOTORSPORT IMAGES: Force India VJM02 side view
MOTORSPORT IMAGES: Force India VJM02 side view. (Illustration by Giorgio Piola/Motorsport Images)

Background imageWhole Car Collection: DUPLICATE: McLaren MP4-25 top view: MOTORSPORT IMAGES: DUPLICATE: McLaren MP4-25 top view

DUPLICATE: McLaren MP4-25 top view: MOTORSPORT IMAGES: DUPLICATE: McLaren MP4-25 top view
MOTORSPORT IMAGES: DUPLICATE: McLaren MP4-25 top view. (Illustration by Giorgio Piola/Motorsport Images)

Background imageWhole Car Collection: McLaren MP4-24 2009 Jerez test side view: MOTORSPORT IMAGES: McLaren MP4-24 2009 Jerez test side

McLaren MP4-24 2009 Jerez test side view: MOTORSPORT IMAGES: McLaren MP4-24 2009 Jerez test side view
MOTORSPORT IMAGES: McLaren MP4-24 2009 Jerez test side view. (Illustration by Giorgio Piola/Motorsport Images)

Background imageWhole Car Collection: McLaren MP4-14 1999 multiple views: MOTORSPORT IMAGES: McLaren MP4-14 1999 multiple views

McLaren MP4-14 1999 multiple views: MOTORSPORT IMAGES: McLaren MP4-14 1999 multiple views
MOTORSPORT IMAGES: McLaren MP4-14 1999 multiple views. (Illustration by Giorgio Piola/Motorsport Images)

Background imageWhole Car Collection: Ferrari 312T2 1976 compared with 312T: MOTORSPORT IMAGES: Ferrari 312T2 1976 compared with 312T

Ferrari 312T2 1976 compared with 312T: MOTORSPORT IMAGES: Ferrari 312T2 1976 compared with 312T
MOTORSPORT IMAGES: Ferrari 312T2 1976 compared with 312T. (Illustration by Giorgio Piola/Motorsport Images)

Background imageWhole Car Collection: Tyrrell P34 1976 six wheeler frontal comparison to 007: MOTORSPORT IMAGES

Tyrrell P34 1976 six wheeler frontal comparison to 007: MOTORSPORT IMAGES
MOTORSPORT IMAGES: Tyrrell P34 1976 six wheeler frontal comparison to 007. (Illustration by Giorgio Piola/Motorsport Images)

Background imageWhole Car Collection: Lotus 72D 1973 side view: MOTORSPORT IMAGES: Lotus 72D 1973 side view

Lotus 72D 1973 side view: MOTORSPORT IMAGES: Lotus 72D 1973 side view
MOTORSPORT IMAGES: Lotus 72D 1973 side view. (Illustration by Giorgio Piola/Motorsport Images)

Background imageWhole Car Collection: Lotus 49B 1968 double aerofoil overview: MOTORSPORT IMAGES: Lotus 49B 1968 double aerofoil overview

Lotus 49B 1968 double aerofoil overview: MOTORSPORT IMAGES: Lotus 49B 1968 double aerofoil overview
MOTORSPORT IMAGES: Lotus 49B 1968 double aerofoil overview. (Illustration by Giorgio Piola/Motorsport Images)

Background imageWhole Car Collection: McLaren MP4-29 side view: MOTORSPORT IMAGES: McLaren MP4-29 side view

McLaren MP4-29 side view: MOTORSPORT IMAGES: McLaren MP4-29 side view
MOTORSPORT IMAGES: McLaren MP4-29 side view. (Illustration by Giorgio Piola/Motorsport Images)

Background imageWhole Car Collection: Tyrrell 024 1996 Italian GP solid upper wishbone detail: MOTORSPORT IMAGES

Tyrrell 024 1996 Italian GP solid upper wishbone detail: MOTORSPORT IMAGES
MOTORSPORT IMAGES: Tyrrell 024 1996 Italian GP solid upper wishbone detail. (Illustration by Giorgio Piola/Motorsport Images)

Background imageWhole Car Collection: Williams FW08 1982 exploded-detail overview: MOTORSPORT IMAGES

Williams FW08 1982 exploded-detail overview: MOTORSPORT IMAGES: Williams FW08 1982 exploded-detail overview
MOTORSPORT IMAGES: Williams FW08 1982 exploded-detail overview. (Illustration by Giorgio Piola/Motorsport Images)

Background imageWhole Car Collection: Toleman TG184 1984 detailed overview: MOTORSPORT IMAGES: Toleman TG184 1984 detailed overview

Toleman TG184 1984 detailed overview: MOTORSPORT IMAGES: Toleman TG184 1984 detailed overview
MOTORSPORT IMAGES: Toleman TG184 1984 detailed overview. (Illustration by Giorgio Piola/Motorsport Images)

Background imageWhole Car Collection: Lotus 100T 1988 detailed overview: MOTORSPORT IMAGES: Lotus 100T 1988 detailed overview

Lotus 100T 1988 detailed overview: MOTORSPORT IMAGES: Lotus 100T 1988 detailed overview
MOTORSPORT IMAGES: Lotus 100T 1988 detailed overview. (Illustration by Giorgio Piola/Motorsport Images)

Background imageWhole Car Collection: Ferrari 312T4 1979: MOTORSPORT IMAGES: Ferrari 312T4 1979

Ferrari 312T4 1979: MOTORSPORT IMAGES: Ferrari 312T4 1979
MOTORSPORT IMAGES: Ferrari 312T4 1979. (Illustration by Giorgio Piola/Motorsport Images)

Background imageWhole Car Collection: Ferrari F399 1999 overview: MOTORSPORT IMAGES: Ferrari F399 1999 overview

Ferrari F399 1999 overview: MOTORSPORT IMAGES: Ferrari F399 1999 overview
MOTORSPORT IMAGES: Ferrari F399 (650) 1999 overview. (Illustration by Giorgio Piola/Motorsport Images)

Background imageWhole Car Collection: Tyrrell 019 1990 overview: MOTORSPORT IMAGES: Tyrrell 019 1990 overview

Tyrrell 019 1990 overview: MOTORSPORT IMAGES: Tyrrell 019 1990 overview
MOTORSPORT IMAGES: Tyrrell 019 1990 overview. (Illustration by Giorgio Piola/Motorsport Images)

Background imageWhole Car Collection: Safety proposals for 1987: MOTORSPORT IMAGES: Safety proposals for 1987

Safety proposals for 1987: MOTORSPORT IMAGES: Safety proposals for 1987
MOTORSPORT IMAGES: Safety proposals for 1987. (Illustration by Giorgio Piola/Motorsport Images)

Background imageWhole Car Collection: Toyota TF104B floor, detail inset: MOTORSPORT IMAGES: Toyota TF104B floor, detail inset

Toyota TF104B floor, detail inset: MOTORSPORT IMAGES: Toyota TF104B floor, detail inset
MOTORSPORT IMAGES: Toyota TF104B floor, detail inset. (Illustration by Giorgio Piola/Motorsport Images)

Background imageWhole Car Collection: DUPLICATE: BMW Sauber F1. 06 steering wheel: MOTORSPORT IMAGES: DUPLICATE: BMW Sauber F1

DUPLICATE: BMW Sauber F1. 06 steering wheel: MOTORSPORT IMAGES: DUPLICATE: BMW Sauber F1. 06 steering wheel
MOTORSPORT IMAGES: DUPLICATE: BMW Sauber F1.06 steering wheel. (Illustration by Giorgio Piola/Motorsport Images)

Background imageWhole Car Collection: Toyota TF109 2009 Monza rear wing: MOTORSPORT IMAGES: Toyota TF109 2009 Monza rear wing

Toyota TF109 2009 Monza rear wing: MOTORSPORT IMAGES: Toyota TF109 2009 Monza rear wing
MOTORSPORT IMAGES: Toyota TF109 2009 Monza rear wing. (Illustration by Giorgio Piola/Motorsport Images)

Background imageWhole Car Collection: Williams FW31 2009 front wing and nose: MOTORSPORT IMAGES: Williams FW31 2009 front wing and nose

Williams FW31 2009 front wing and nose: MOTORSPORT IMAGES: Williams FW31 2009 front wing and nose
MOTORSPORT IMAGES: Williams FW31 2009 front wing and nose. (Illustration by Giorgio Piola/Motorsport Images)

Background imageWhole Car Collection: Red Bull RB5 2009 Abu Dhabi side view: MOTORSPORT IMAGES: Red Bull RB5 2009 Abu Dhabi side view

Red Bull RB5 2009 Abu Dhabi side view: MOTORSPORT IMAGES: Red Bull RB5 2009 Abu Dhabi side view
MOTORSPORT IMAGES: Red Bull RB5 2009 Abu Dhabi side view. (Illustration by Giorgio Piola/Motorsport Images)

Background imageWhole Car Collection: Mercedes W01 side view: MOTORSPORT IMAGES: Mercedes W01 side view

Mercedes W01 side view: MOTORSPORT IMAGES: Mercedes W01 side view
MOTORSPORT IMAGES: Mercedes W01 side view. (Illustration by Giorgio Piola/Motorsport Images)

Background imageWhole Car Collection: BMW Sauber C29 side view: MOTORSPORT IMAGES: BMW Sauber C29 side view

BMW Sauber C29 side view: MOTORSPORT IMAGES: BMW Sauber C29 side view
MOTORSPORT IMAGES: BMW Sauber C29 side view. (Illustration by Giorgio Piola/Motorsport Images)

Background imageWhole Car Collection: Ferrari F10 with various rear wing and F-Duct configurations

Ferrari F10 with various rear wing and F-Duct configurations
MOTORSPORT IMAGES: Ferrari F10 with various rear wing and F-Duct configurations. (Illustration by Giorgio Piola/Motorsport Images)

Background imageWhole Car Collection: Sauber C31 / Ferrari gearbox: MOTORSPORT IMAGES: Sauber C31 / Ferrari gearbox

Sauber C31 / Ferrari gearbox: MOTORSPORT IMAGES: Sauber C31 / Ferrari gearbox
MOTORSPORT IMAGES: Sauber C31 / Ferrari gearbox. (Illustration by Giorgio Piola/Motorsport Images)

Background imageWhole Car Collection: McLaren MP4-23 2008 side view: MOTORSPORT IMAGES: McLaren MP4-23 2008 side view

McLaren MP4-23 2008 side view: MOTORSPORT IMAGES: McLaren MP4-23 2008 side view
MOTORSPORT IMAGES: McLaren MP4-23 2008 side view. (Illustration by Giorgio Piola/Motorsport Images)

Background imageWhole Car Collection: Williams FW26 2004 multiple nose view: MOTORSPORT IMAGES: Williams FW26 2004 multiple nose view

Williams FW26 2004 multiple nose view: MOTORSPORT IMAGES: Williams FW26 2004 multiple nose view
MOTORSPORT IMAGES: Williams FW26 2004 multiple nose view. (Illustration by Giorgio Piola/Motorsport Images)

Background imageWhole Car Collection: McLaren MP4 / 26 wireframe and rendered nose: MOTORSPORT IMAGES

McLaren MP4 / 26 wireframe and rendered nose: MOTORSPORT IMAGES: McLaren MP4 / 26 wireframe and rendered nose
MOTORSPORT IMAGES: McLaren MP4/26 wireframe and rendered nose. (Illustration by Giorgio Piola/Motorsport Images)

Background imageWhole Car Collection: Arrows A20 1999 engine and cooling packaging: MOTORSPORT IMAGES

Arrows A20 1999 engine and cooling packaging: MOTORSPORT IMAGES: Arrows A20 1999 engine and cooling packaging
MOTORSPORT IMAGES: Arrows A20 1999 engine and cooling packaging. (Illustration by Giorgio Piola/Motorsport Images)

Background imageWhole Car Collection: McLaren MP4-18 2003 side view: MOTORSPORT IMAGES: McLaren MP4-18 2003 side view

McLaren MP4-18 2003 side view: MOTORSPORT IMAGES: McLaren MP4-18 2003 side view
MOTORSPORT IMAGES: McLaren MP4-18 2003 side view. (Illustration by Giorgio Piola/Motorsport Images)

Background imageWhole Car Collection: Renault R202 2002: MOTORSPORT IMAGES: Renault R202 2002

Renault R202 2002: MOTORSPORT IMAGES: Renault R202 2002
MOTORSPORT IMAGES: Renault R202 2002. (Illustration by Giorgio Piola/Motorsport Images)

Background imageWhole Car Collection: Mercedes W03 top view: MOTORSPORT IMAGES: Mercedes W03 top view

Mercedes W03 top view: MOTORSPORT IMAGES: Mercedes W03 top view
MOTORSPORT IMAGES: Mercedes W03 top view. (Illustration by Giorgio Piola/Motorsport Images)

Background imageWhole Car Collection: DUPLICATE: McLaren MP4-27 top view: MOTORSPORT IMAGES: DUPLICATE: McLaren MP4-27 top view

DUPLICATE: McLaren MP4-27 top view: MOTORSPORT IMAGES: DUPLICATE: McLaren MP4-27 top view
MOTORSPORT IMAGES: DUPLICATE: McLaren MP4-27 top view. (Illustration by Giorgio Piola/Motorsport Images)

Background imageWhole Car Collection: Marussia MR02 side view: MOTORSPORT IMAGES: Marussia MR02 side view

Marussia MR02 side view: MOTORSPORT IMAGES: Marussia MR02 side view
MOTORSPORT IMAGES: Marussia MR02 side view. (Illustration by Giorgio Piola/Motorsport Images)

Background imageWhole Car Collection: Lotus E20 top view: MOTORSPORT IMAGES: Lotus E20 top view

Lotus E20 top view: MOTORSPORT IMAGES: Lotus E20 top view
MOTORSPORT IMAGES: Lotus E20 top view. (Illustration by Giorgio Piola/Motorsport Images)

Background imageWhole Car Collection: HRT F112 side view: MOTORSPORT IMAGES: HRT F112 side view

HRT F112 side view: MOTORSPORT IMAGES: HRT F112 side view
MOTORSPORT IMAGES: HRT F112 side view. (Illustration by Giorgio Piola/Motorsport Images)

Background imageWhole Car Collection: Williams FW33 side view, Abu Dhabi GP: MOTORSPORT IMAGES: Williams FW33 side view, Abu Dhabi GP

Williams FW33 side view, Abu Dhabi GP: MOTORSPORT IMAGES: Williams FW33 side view, Abu Dhabi GP
MOTORSPORT IMAGES: Williams FW33 side view, Abu Dhabi GP. (Illustration by Giorgio Piola/Motorsport Images)

Background imageWhole Car Collection: Caterham CT-01 side view: MOTORSPORT IMAGES: Caterham CT-01 side view

Caterham CT-01 side view: MOTORSPORT IMAGES: Caterham CT-01 side view
MOTORSPORT IMAGES: Caterham CT-01 side view. (Illustration by Giorgio Piola/Motorsport Images)

Background imageWhole Car Collection: Red Bull RB7 side view, Italian GP: MOTORSPORT IMAGES: Red Bull RB7 side view, Italian GP

Red Bull RB7 side view, Italian GP: MOTORSPORT IMAGES: Red Bull RB7 side view, Italian GP
MOTORSPORT IMAGES: Red Bull RB7 side view, Italian GP. (Illustration by Giorgio Piola/Motorsport Images)

Background imageWhole Car Collection: McLaren MP4 / 26 side view, German GP: MOTORSPORT IMAGES: McLaren MP4 / 26 side view, German GP

McLaren MP4 / 26 side view, German GP: MOTORSPORT IMAGES: McLaren MP4 / 26 side view, German GP
MOTORSPORT IMAGES: McLaren MP4/26 side view, German GP. (Illustration by Giorgio Piola/Motorsport Images)

Background imageWhole Car Collection: Ferrari F2012 side view: MOTORSPORT IMAGES: Ferrari F2012 side view

Ferrari F2012 side view: MOTORSPORT IMAGES: Ferrari F2012 side view
MOTORSPORT IMAGES: Ferrari F2012 side view. (Illustration by Giorgio Piola/Motorsport Images)

Background imageWhole Car Collection: Toro Rosso brake disc mounting bells: MOTORSPORT IMAGES: Toro Rosso brake disc mounting bells

Toro Rosso brake disc mounting bells: MOTORSPORT IMAGES: Toro Rosso brake disc mounting bells
MOTORSPORT IMAGES: Toro Rosso brake disc mounting bells. (Illustration by Giorgio Piola/Motorsport Images)

Background imageWhole Car Collection: Minardi M02 2000 side view: MOTORSPORT IMAGES: Minardi M02 2000 side view

Minardi M02 2000 side view: MOTORSPORT IMAGES: Minardi M02 2000 side view
MOTORSPORT IMAGES: Minardi M02 2000 side view. (Illustration by Giorgio Piola/Motorsport Images)


For sale as Licensed Images

Choose your image, Select your licence and Download the media

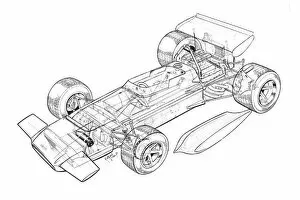
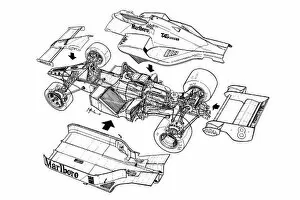
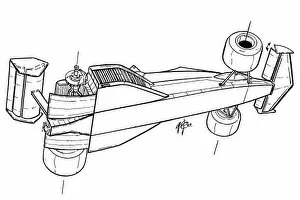
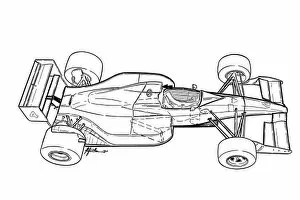
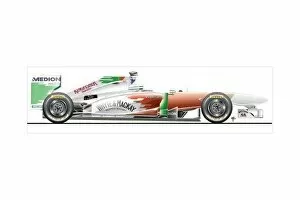
"Capturing the Essence: A Glimpse into the World of Whole Cars" Step into the realm of motorsport engineering as we delve deep into the intricate details and breathtaking views of some iconic whole cars. From rear suspension intricacies to stunning overviews, let's embark on a visual journey that showcases these magnificent machines. First up, we have Williams FW16 1994 rear suspension detail view. Witness the precision and craftsmanship that goes into creating a seamless blend of power and control. Every component meticulously designed to enhance performance on the track. Moving on, our attention turns to Ferrari F399 1999 overview. This masterpiece exudes elegance with its sleek lines and aerodynamic prowess. Get ready to be captivated by its sheer beauty as it stands tall among its competitors. Next in line is the Ferrari F399 3/4 view - an angle that perfectly captures this beast in all its glory. Feel your heart race as you witness this marvel tearing through corners with unmatched agility and speed. Now, let's shift gears to explore another fascinating creation - Williams FW26 Walrus nose (duplicate). The unique design sets it apart from others, pushing boundaries while challenging traditional aesthetics. Innovation at its finest. Prepare yourself for a glimpse of perfection with Red Bull RB5 3/4 view. Its dynamic stance commands attention while showcasing cutting-edge technology fused seamlessly with style. Truly a force to be reckoned with on any racetrack. Our journey continues with Force India VJM02 side view - an embodiment of grace and power combined effortlessly in one machine. Admire how form meets function flawlessly, resulting in an awe-inspiring spectacle that leaves spectators breathless. Let's not forget McLaren MP4-24 2009 Jerez test side view – a testament to relentless pursuit for excellence even during testing phases. Witness their dedication firsthand as they fine-tune every aspect for optimum performance under extreme conditions.