
Www2 Collection (#3)

"Unveiling the Untold Stories

Background imageWww2 Collection: Blitz, 1940-41: Dawn breaks over Swansea (b/w photo)

Blitz, 1940-41: Dawn breaks over Swansea (b/w photo)
8634818 Blitz, 1940-41: Dawn breaks over Swansea (b/w photo) by English Photographer, (20th century); Private Collection; (add.info.: Dawn breaks over Swansea)

Background imageWww2 Collection: Modern armaments, 1938: Tank in action (b/w photo)

Modern armaments, 1938: Tank in action (b/w photo)
8634538 Modern armaments, 1938: Tank in action (b/w photo) by English Photographer, (20th century); Private Collection; (add.info.: Tank in action)

Background imageWww2 Collection: Piccadilly Circus, London (b/w photo)

Piccadilly Circus, London (b/w photo)
8635445 Piccadilly Circus, London (b/w photo) by English Photographer, (20th century); Private Collection; (add.info.: Piccadilly Circus, London. Postcard, early 20th century.); © Look and Learn

Background imageWww2 Collection: Blitz, 1940-41: Elephant and Castle Tube Station, 11 November 1940 (b/w photo)

Blitz, 1940-41: Elephant and Castle Tube Station, 11 November 1940 (b/w photo)
8634822 Blitz, 1940-41: Elephant and Castle Tube Station, 11 November 1940 (b/w photo) by English Photographer, (20th century); Private Collection; (add.info.: Elephant and Castle Tube Station)

Background imageWww2 Collection: Modern armaments, 1938: A parachute descent (b/w photo)

Modern armaments, 1938: A parachute descent (b/w photo)
8634541 Modern armaments, 1938: A parachute descent (b/w photo) by English Photographer, (20th century); Private Collection; (add.info.: A parachute descent)

Background imageWww2 Collection: Theatres in London's West End, World War II (b/w photo)

Theatres in London's West End, World War II (b/w photo)
8672645 Theatres in London's West End, World War II (b/w photo) by English Photographer, (20th century); Private Collection; (add.info.: Theatres in London's West End, World War II)

Background imageWww2 Collection: Buckingham Palace, London, damaged during the Blitz, World War II (b/w photo)

Buckingham Palace, London, damaged during the Blitz, World War II (b/w photo)
8672644 Buckingham Palace, London, damaged during the Blitz, World War II (b/w photo) by English Photographer, (20th century); Private Collection; (add.info.: Buckingham Palace, London)

Background imageWww2 Collection: Saving waste paper for the war effort, World War II (b/w photo)

Saving waste paper for the war effort, World War II (b/w photo)
8672638 Saving waste paper for the war effort, World War II (b/w photo) by English Photographer, (20th century); Private Collection; (add.info.: Saving waste paper for the war effort, World War II)

Background imageWww2 Collection: Pipers of The Cameronians (Scottish Rifles) marching out from the Tower of London (b/w photo)

Pipers of The Cameronians (Scottish Rifles) marching out from the Tower of London (b/w photo)
8664047 Pipers of The Cameronians (Scottish Rifles) marching out from the Tower of London (b/w photo) by English Photographer

Background imageWww2 Collection: Launching of HMS Ark Royal, 1937 (b/w photo)

Launching of HMS Ark Royal, 1937 (b/w photo)
8663976 Launching of HMS Ark Royal, 1937 (b/w photo) by English Photographer, (20th century); Private Collection; (add.info.: Launching of HMS Ark Royal, Birkenhead, 1937)

Background imageWww2 Collection: Modern armaments, 1938: Tank Negotiating Bank (b/w photo)

Modern armaments, 1938: Tank Negotiating Bank (b/w photo)
8660685 Modern armaments, 1938: Tank Negotiating Bank (b/w photo) by English Photographer, (20th century); Private Collection; (add.info.: Tank Negotiating Bank)

Background imageWww2 Collection: Modern armaments, 1938: Old and New Field Dress (b/w photo)

Modern armaments, 1938: Old and New Field Dress (b/w photo)
8660683 Modern armaments, 1938: Old and New Field Dress (b/w photo) by English Photographer, (20th century); Private Collection; (add.info.: Old and New Field Dress)

Background imageWww2 Collection: Modern armaments, 1938: Latest 3.7 Howitzers, Pneumatic Tyres (b/w photo)

Modern armaments, 1938: Latest 3.7 Howitzers, Pneumatic Tyres (b/w photo)
8660680 Modern armaments, 1938: Latest 3.7 Howitzers, Pneumatic Tyres (b/w photo) by English Photographer, (20th century); Private Collection; (add.info.: Latest 3.7 Howitzers, Pneumatic Tyres)

Background imageWww2 Collection: Modern armaments, 1938: Firing a Naval Torpedo (b/w photo)

Modern armaments, 1938: Firing a Naval Torpedo (b/w photo)
8660670 Modern armaments, 1938: Firing a Naval Torpedo (b/w photo) by English Photographer, (20th century); Private Collection; (add.info.: Firing a Naval Torpedo)

Background imageWww2 Collection: Modern armaments, 1938: Troops prepared for Gas Attack (b/w photo)

Modern armaments, 1938: Troops prepared for Gas Attack (b/w photo)
8660669 Modern armaments, 1938: Troops prepared for Gas Attack (b/w photo) by English Photographer, (20th century); Private Collection; (add.info.: Troops prepared for Gas Attack)

Background imageWww2 Collection: Modern armaments, 1938: Latest Range Finder (b/w photo)

Modern armaments, 1938: Latest Range Finder (b/w photo)
8660665 Modern armaments, 1938: Latest Range Finder (b/w photo) by English Photographer, (20th century); Private Collection; (add.info.: Latest Range Finder)

Background imageWww2 Collection: Modern armaments, 1938: A Giant Flying Boat (b/w photo)

Modern armaments, 1938: A Giant Flying Boat (b/w photo)
8660664 Modern armaments, 1938: A Giant Flying Boat (b/w photo) by English Photographer, (20th century); Private Collection; (add.info.: A Giant Flying Boat)

Background imageWww2 Collection: Modern armaments, 1938: Warships Cleared for Action (b/w photo)

Modern armaments, 1938: Warships Cleared for Action (b/w photo)
8660663 Modern armaments, 1938: Warships Cleared for Action (b/w photo) by English Photographer, (20th century); Private Collection; (add.info.: Warships Cleared for Action)

Background imageWww2 Collection: WW2: Halifaxes over Brest (b/w photo)

WW2: Halifaxes over Brest (b/w photo)
8639408 WW2: Halifaxes over Brest (b/w photo) by English Photographer, (20th century); Private Collection; (add.info.: Halifaxes over Brest. Illustration for R.A.F. The Second Year (A&C Black, 1942)

Background imageWww2 Collection: Scottish National War Memorial: The Padres (b/w photo)

Scottish National War Memorial: The Padres (b/w photo)
8648399 Scottish National War Memorial: The Padres (b/w photo) by English Photographer, (20th century); Private Collection; (add.info.: The Padres)

Background imageWww2 Collection: Scottish National War Memorial: The Royal Artillery (b/w photo)

Scottish National War Memorial: The Royal Artillery (b/w photo)
8648376 Scottish National War Memorial: The Royal Artillery (b/w photo) by English Photographer, (20th century); Private Collection; (add.info.: The Royal Artillery)

Background imageWww2 Collection: Scottish National War Memorial: The King's Own Scottish Borderers (b/w photo)

Scottish National War Memorial: The King's Own Scottish Borderers (b/w photo)
8648371 Scottish National War Memorial: The King's Own Scottish Borderers (b/w photo) by English Photographer, (20th century); Private Collection; (add.info)

Background imageWww2 Collection: Scottish National War Memorial: Scots Guards (b/w photo)

Scottish National War Memorial: Scots Guards (b/w photo)
8648370 Scottish National War Memorial: Scots Guards (b/w photo) by English Photographer, (20th century); Private Collection; (add.info.: Scots Guards)

Background imageWww2 Collection: Scottish National War Memorial: The Black Watch, Royal Highland Regiment (b/w photo)

Scottish National War Memorial: The Black Watch, Royal Highland Regiment (b/w photo)
8648369 Scottish National War Memorial: The Black Watch, Royal Highland Regiment (b/w photo) by English Photographer, (20th century); Private Collection; (add.info.: The Black Watch)

Background imageWww2 Collection: WAAFs at work at Coastal Command Headquarters operations room (b/w photo)

WAAFs at work at Coastal Command Headquarters operations room (b/w photo)
8649416 WAAFs at work at Coastal Command Headquarters operations room (b/w photo) by English Photographer, (20th century); Private Collection; (add.info)

Background imageWww2 Collection: Flight Mechanics working on a Beaufighter (b/w photo)

Flight Mechanics working on a Beaufighter (b/w photo)
8649407 Flight Mechanics working on a Beaufighter (b/w photo) by English Photographer, (20th century); Private Collection; (add.info.: Flight Mechanics working on a Beaufighter)

Background imageWww2 Collection: MT Driver towing a Lancaster (b/w photo)

MT Driver towing a Lancaster (b/w photo)
8649403 MT Driver towing a Lancaster (b/w photo) by English Photographer, (20th century); Private Collection; (add.info.: MT Driver towing a Lancaster. Illustration for The W.A.A.F)

Background imageWww2 Collection: Early morning ground crew (b/w photo)

Early morning ground crew (b/w photo)
8649427 Early morning ground crew (b/w photo) by English Photographer, (20th century); Private Collection; (add.info.: Early morning ground crew. Illustration for The W.A.A.F)

Background imageWww2 Collection: Scottish National War Memorial: East Transept (b/w photo)

Scottish National War Memorial: East Transept (b/w photo)
8648362 Scottish National War Memorial: East Transept (b/w photo) by English Photographer, (20th century); Private Collection; (add.info.: East Transept)

Background imageWww2 Collection: WW2 and the Inner Temple: The Interior of the Inner Temple Hall after the Raids (b/w photo)

WW2 and the Inner Temple: The Interior of the Inner Temple Hall after the Raids (b/w photo)
8653464 WW2 and the Inner Temple: The Interior of the Inner Temple Hall after the Raids (b/w photo) by English Photographer

Background imageWww2 Collection: WW2 and the Inner Temple: Crown Office Row after the Raids (b/w photo)

WW2 and the Inner Temple: Crown Office Row after the Raids (b/w photo)
8653463 WW2 and the Inner Temple: Crown Office Row after the Raids (b/w photo) by English Photographer, (20th century); Private Collection; (add.info.: Crown Office Row after the Raids)

Background imageWww2 Collection: WW2 and the Inner Temple: Crown Office Row before the Raids (b/w photo)

WW2 and the Inner Temple: Crown Office Row before the Raids (b/w photo)
8653461 WW2 and the Inner Temple: Crown Office Row before the Raids (b/w photo) by English Photographer, (20th century); Private Collection; (add.info.: Crown Office Row before the Raids)

Background imageWww2 Collection: Scottish National War Memorial: The Shrine on the Virgin Rock (b/w photo)

Scottish National War Memorial: The Shrine on the Virgin Rock (b/w photo)
8651296 Scottish National War Memorial: The Shrine on the Virgin Rock (b/w photo) by English Photographer, (20th century); Private Collection; (add.info.: The Shrine on the Virgin Rock)

Background imageWww2 Collection: Beauties of To-Day, 1940: Mary Maguire (colour photo)

Beauties of To-Day, 1940: Mary Maguire (colour photo)
8668500 Beauties of To-Day, 1940: Mary Maguire (colour photo) by English Photographer, (20th century); Private Collection; (add.info.: Mary Maguire)

Background imageWww2 Collection: France, Lower Normandy, Calvados (14), Deauville: landing of a Farman biplane on Deauville beach

France, Lower Normandy, Calvados (14), Deauville: landing of a Farman biplane on Deauville beach with a crowd of
LUX4801967 France, Lower Normandy, Calvados (14), Deauville: landing of a Farman biplane on Deauville beach with a crowd of curious people, 1910; (add.info.: France, Lower Normandy, Calvados (14)

Background imageWww2 Collection: WW2: Daylight raid (b/w photo)

WW2: Daylight raid (b/w photo)
8639407 WW2: Daylight raid (b/w photo) by English Photographer, (20th century); Private Collection; (add.info.: Daylight raid. Bomber crews are briefed at their base. Illustration for R.A.F)

Background imageWww2 Collection: WW2: Maintenance work on a Wellington bomber in the Middle East (b/w photo)

WW2: Maintenance work on a Wellington bomber in the Middle East (b/w photo)
8639401 WW2: Maintenance work on a Wellington bomber in the Middle East (b/w photo) by English Photographer, (20th century); Private Collection; (add.info)

Background imageWww2 Collection: Roll out the Barrel! (b/w photo)

Roll out the Barrel! (b/w photo)
8664050 Roll out the Barrel! (b/w photo) by English Photographer, (20th century); Private Collection; (add.info.: Roll out the Barrel)

Background imageWww2 Collection: Horsemanship of a British cavalryman (b/w photo)

Horsemanship of a British cavalryman (b/w photo)
8664046 Horsemanship of a British cavalryman (b/w photo) by English Photographer, (20th century); Private Collection; (add.info.: Horsemanship of a British cavalryman)

Background imageWww2 Collection: Saving for the war effort, World War II (b/w photo)

Saving for the war effort, World War II (b/w photo)
8672696 Saving for the war effort, World War II (b/w photo) by English Photographer, (20th century); Private Collection; (add.info.: Saving for the war effort, World War II)

Background imageWww2 Collection: Piccadilly, London, before and during World War II (b/w photo)

Piccadilly, London, before and during World War II (b/w photo)
8672652 Piccadilly, London, before and during World War II (b/w photo) by English Photographer, (20th century); Private Collection; (add.info.: Piccadilly, London, before and during World War II)

Background imageWww2 Collection: Damage to Girdler's Hall, City of London, during the Blitz, World War II (b/w photo)

Damage to Girdler's Hall, City of London, during the Blitz, World War II (b/w photo)
8672647 Damage to Girdler's Hall, City of London, during the Blitz, World War II (b/w photo) by English Photographer, (20th century); Private Collection; (add.info.: Damage to Girdler's Hall)

Background imageWww2 Collection: R/T Operator gives a pilot take-off instructions (b/w photo)

R/T Operator gives a pilot take-off instructions (b/w photo)
8649411 R/T Operator gives a pilot take-off instructions (b/w photo) by English Photographer, (20th century); Private Collection; (add.info.: R/T Operator gives a pilot take-off instructions)

Background imageWww2 Collection: Teleprinter Operators at a fighter station (b/w photo)

Teleprinter Operators at a fighter station (b/w photo)
8649409 Teleprinter Operators at a fighter station (b/w photo) by English Photographer, (20th century); Private Collection; (add.info.: Teleprinter Operators at a fighter station)

Background imageWww2 Collection: Scottish National War Memorial: The Royal Air Force (b/w photo)

Scottish National War Memorial: The Royal Air Force (b/w photo)
8648364 Scottish National War Memorial: The Royal Air Force (b/w photo) by English Photographer, (20th century); Private Collection; (add.info.: The Royal Air Force)

Background imageWww2 Collection: Scottish National War Memorial: The Household Cavalry (b/w photo)

Scottish National War Memorial: The Household Cavalry (b/w photo)
8648412 Scottish National War Memorial: The Household Cavalry (b/w photo) by English Photographer, (20th century); Private Collection; (add.info.: The Household Cavalry)

Background imageWww2 Collection: Scottish National War Memorial: The Liverpool, London and South African Scottish (b/w photo)

Scottish National War Memorial: The Liverpool, London and South African Scottish (b/w photo)
8648386 Scottish National War Memorial: The Liverpool, London and South African Scottish (b/w photo) by English Photographer, (20th century); Private Collection; (add.info.: The Liverpool)

Background imageWww2 Collection: Scottish National War Memorial: Hall of Honour and Gateway to Shrine (b/w photo)

Scottish National War Memorial: Hall of Honour and Gateway to Shrine (b/w photo)
8648368 Scottish National War Memorial: Hall of Honour and Gateway to Shrine (b/w photo) by English Photographer, (20th century); Private Collection; (add.info.: Hall of Honour and Gateway to Shrine)


For sale as Licensed Images

Choose your image, Select your licence and Download the media

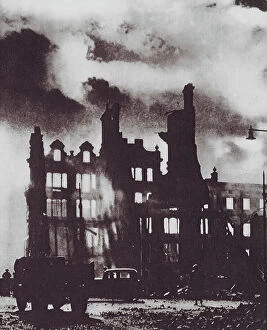
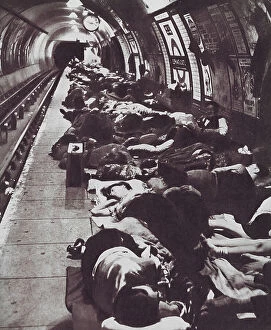
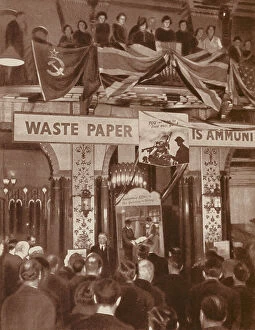
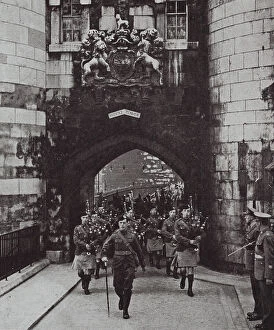
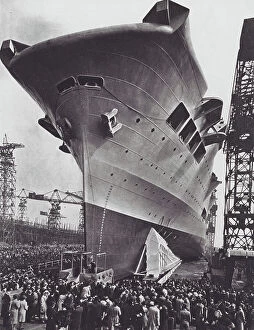
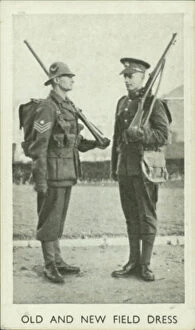
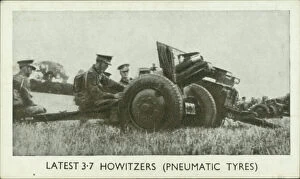
"Unveiling the Untold Stories: A Glimpse into WWII Through Captivating Photographs" Step back in time to witness the extraordinary events that unfolded during World War II. In this captivating collection of black and white photographs, we embark on a journey through history, exploring pivotal moments that shaped our world. Our first stop takes us to Slapton Sands in Devon, where meticulous preparations for the Normandy Landings were underway. The beach buzzes with activity as soldiers gear up for one of the most significant military operations in history. Next, we find ourselves outside Buckingham Palace alongside King George VI and Queen Mother Elizabeth. Despite bomb damage suffered during a devastating attack in September 1940, their resilience shines through as they stand tall amidst destruction caused by war. Moving across continents, we witness African American soldiers liberating Rennes in Brittany. Their courage and determination break down barriers while fighting for freedom and equality on foreign soil. Delving underground into the intricate tunnels of France's Maginot Line, we uncover secrets hidden beneath its surface. These fortifications serve as a testament to human ingenuity and strategic planning during times of conflict. Seeking refuge becomes a stark reality within Caen Cathedral as people huddle together amidst uncertainty and fear. The haunting image captures both vulnerability and strength amid wartime chaos. At Lille station, German soldiers gather before departing for battlefields unknown. This snapshot freezes an instant where destinies intertwine—both conquerors and victims caught within the relentless grip of war's clutches. A heartwarming scene unfolds at Cherbourg when American soldiers engage in friendly conversation with young French women—a fleeting moment of respite from the horrors surrounding them. In Washington DC stands Franklin Roosevelt delivering an impassioned speech at Eighth American Scientific Congress—an embodiment of leadership striving towards progress even amidst global turmoil. Venturing beyond Europe's borders, Russian artist Alexander Isaakovich Rusakov immortalizes hope amidst the siege of Leningrad.