Framed Print > Asia > Afghanistan > Kandahar
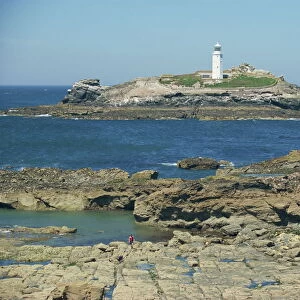
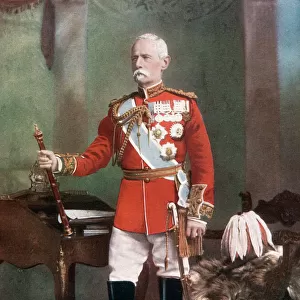
Framed Print : Guns at Waiwand 1880


![]()
Framed Photos from Mary Evans Picture Library
Guns at Waiwand 1880
Battle of Maiwand, saving the guns: though the British force was defeated by the Afghans, they were able to retreat to Kandahar in relatively good order.
27 July 1880
Mary Evans Picture Library makes available wonderful images created for people to enjoy over the centuries
Media ID 14377466
© Mary Evans Picture Library
Afghan Afghans Anglo Artillery Defeated Guns Kandahar Maiwand Retreat Saving Wars
12"x10" Modern Frame
Bring history to life with our exquisite Framed Prints from Media Storehouse, featuring the iconic image "Guns at Waiwand 1880" by Mary Evans Picture Library. This powerful photograph from the Battle of Maiwand captures the determined spirit of the British forces as they save their guns and begin their retreat to Kandahar, despite the defeat. Add this captivating piece to your home or office décor and relive the courage and resilience of the past. Each print is meticulously framed with care to preserve its beauty and authenticity.
10x8 Print in an MDF Wooden Frame with 180 gsm Satin Finish Paper. Glazed using shatter proof thin plexi glass. Frame thickness is 1 inch and depth 0.75 inch. Fluted cardboard backing held with clips. Supplied ready to hang with sawtooth hanger and rubber bumpers. Spot clean with a damp cloth. Packaged foam wrapped in a card.
Contemporary Framed and Mounted Prints - Professionally Made and Ready to Hang
Estimated Image Size (if not cropped) is 25.4cm x 25.4cm (10" x 10")
Estimated Product Size is 30.5cm x 25.4cm (12" x 10")
These are individually made so all sizes are approximate
Artwork printed orientated as per the preview above, with landscape (horizontal) or portrait (vertical) orientation to match the source image.
FEATURES IN THESE COLLECTIONS
> Asia
> Afghanistan
> Kandahar
> Asia
> India
> Related Images
> Historic
> Battles
> Related Images
EDITORS COMMENTS
This evocative image captures the aftermath of the Battle of Maiwand, which took place on July 27, 1880, during the Second Anglo-Afghan War. The British Army, led by Lieutenant General Frederick Roberts, had been attempting to extend their influence in Afghanistan and secure the strategic city of Kandahar. However, they were met with fierce resistance from the Afghan forces under the command of Mir Agha Khan. Despite the British force being defeated, the image shows a remarkable scene of soldiers from the Royal Horse Artillery, under the command of Major General Frederick Burnaby, managing to save their guns from falling into the hands of the victorious Afghans. The determination and quick thinking of these soldiers allowed the British to retreat in relatively good order, preserving their artillery and preventing a greater loss. The Battle of Maiwand is considered a significant moment in the Second Anglo-Afghan War, which lasted from 1878 to 1880. The conflict arose from tensions between the British and Afghan governments, with the former seeking to extend their influence in the region and the latter resisting foreign interference. The war resulted in significant casualties and damage on both sides, and ultimately led to the withdrawal of British forces from Afghanistan until the late 19th century. This photograph, taken by an unknown photographer, provides a glimpse into the intense and often brutal nature of colonial warfare in the late 19th century. It serves as a reminder of the sacrifices made by soldiers on both sides during this period of history and the complex geopolitical dynamics that shaped the modern world.
MADE IN THE USA
Safe Shipping with 30 Day Money Back Guarantee
FREE PERSONALISATION*
We are proud to offer a range of customisation features including Personalised Captions, Color Filters and Picture Zoom Tools
SECURE PAYMENTS
We happily accept a wide range of payment options so you can pay for the things you need in the way that is most convenient for you
* Options may vary by product and licensing agreement. Zoomed Pictures can be adjusted in the Cart.