Photographic Print > Animals > Mammals > Muridae > Peters Mouse
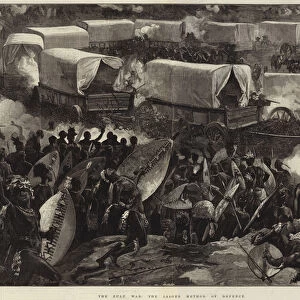
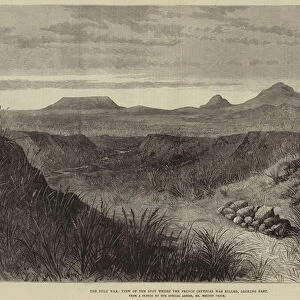
Photographic Print : Zulu war. St Peters, Bishop Colensos church at Pietermaritz

![]()
Photo Prints from Mary Evans Picture Library
Zulu war. St Peters, Bishop Colensos church at Pietermaritz
John William Colenso, Bishop of Natal, rocked the establishment with his radical theological views and his support for the Zulu tribes, against the British and Boers who were invading their territories
Mary Evans Picture Library makes available wonderful images created for people to enjoy over the centuries
Media ID 4376106
© Mary Evans Picture Library 2015 - https://copyrighthub.org/s0/hub1/creation/maryevans/MaryEvansPictureID/10218336
1879 Bishop Boers Colenso Establishment Invading Natal Radical Support Territories Theological Tribes Zulu Rocked Will I Am
11"x8.5" Photo Print
Step back in time with our stunning photographic print from the Media Storehouse collection, featuring "St Peters, Bishop Colenso's Church at Pietermaritz" by Rights Managed from Mary Evans Prints Online. This captivating image transports you to the heart of the Zulu War era, showcasing Bishop John William Colenso's church in St. Peters, Pietermaritzburg. Colenso, the radical Bishop of Natal, defied convention with his progressive theological views and unwavering support for the Zulu tribes. This evocative print is a must-have for history enthusiasts and art collectors alike, adding a touch of intrigue and depth to any space.
Photo prints are produced on Kodak professional photo paper resulting in timeless and breath-taking prints which are also ideal for framing. The colors produced are rich and vivid, with accurate blacks and pristine whites, resulting in prints that are truly timeless and magnificent. Whether you're looking to display your prints in your home, office, or gallery, our range of photographic prints are sure to impress. Dimensions refers to the size of the paper in inches.
Our Photo Prints are in a large range of sizes and are printed on Archival Quality Paper for excellent colour reproduction and longevity. They are ideal for framing (our Framed Prints use these) at a reasonable cost. Alternatives include cheaper Poster Prints and higher quality Fine Art Paper, the choice of which is largely dependant on your budget.
Estimated Image Size (if not cropped) is 27.9cm x 16.6cm (11" x 6.5")
Estimated Product Size is 27.9cm x 21.6cm (11" x 8.5")
These are individually made so all sizes are approximate
Artwork printed orientated as per the preview above, with landscape (horizontal) orientation to match the source image.
EDITORS COMMENTS
This powerful print captures a significant moment in history during the Zulu War at St. Peter's, Bishop Colenso's church in Pietermaritzburg. The figure of John William Colenso, the controversial Bishop of Natal, looms large as he challenges the establishment with his radical theological views and unwavering support for the Zulu tribes.
In a time when British and Boer forces were invading Zulu territories, Bishop Colenso stood firm in his belief that the indigenous people deserved respect and protection against colonial aggression. His advocacy for the rights of the Zulu tribes made him an important figure in shaping the course of history during this tumultuous period.
The image captures not just a physical battle but also a clash of ideologies and values. It serves as a reminder of the complexities and moral dilemmas faced by individuals like Bishop Colenso who dared to challenge authority for what they believed was right.
As we gaze upon this historical snapshot frozen in time, we are reminded of the importance of standing up for justice and equality even in the face of overwhelming opposition. The legacy of Bishop Colenso lives on through this poignant image, inspiring us to question established norms and fight for what is just and humane.
MADE IN THE USA
Safe Shipping with 30 Day Money Back Guarantee
FREE PERSONALISATION*
We are proud to offer a range of customisation features including Personalised Captions, Color Filters and Picture Zoom Tools
FREE COLORIZATION SERVICE
You can choose advanced AI Colorization for this picture at no extra charge!
SECURE PAYMENTS
We happily accept a wide range of payment options so you can pay for the things you need in the way that is most convenient for you
* Options may vary by product and licensing agreement. Zoomed Pictures can be adjusted in the Cart.